
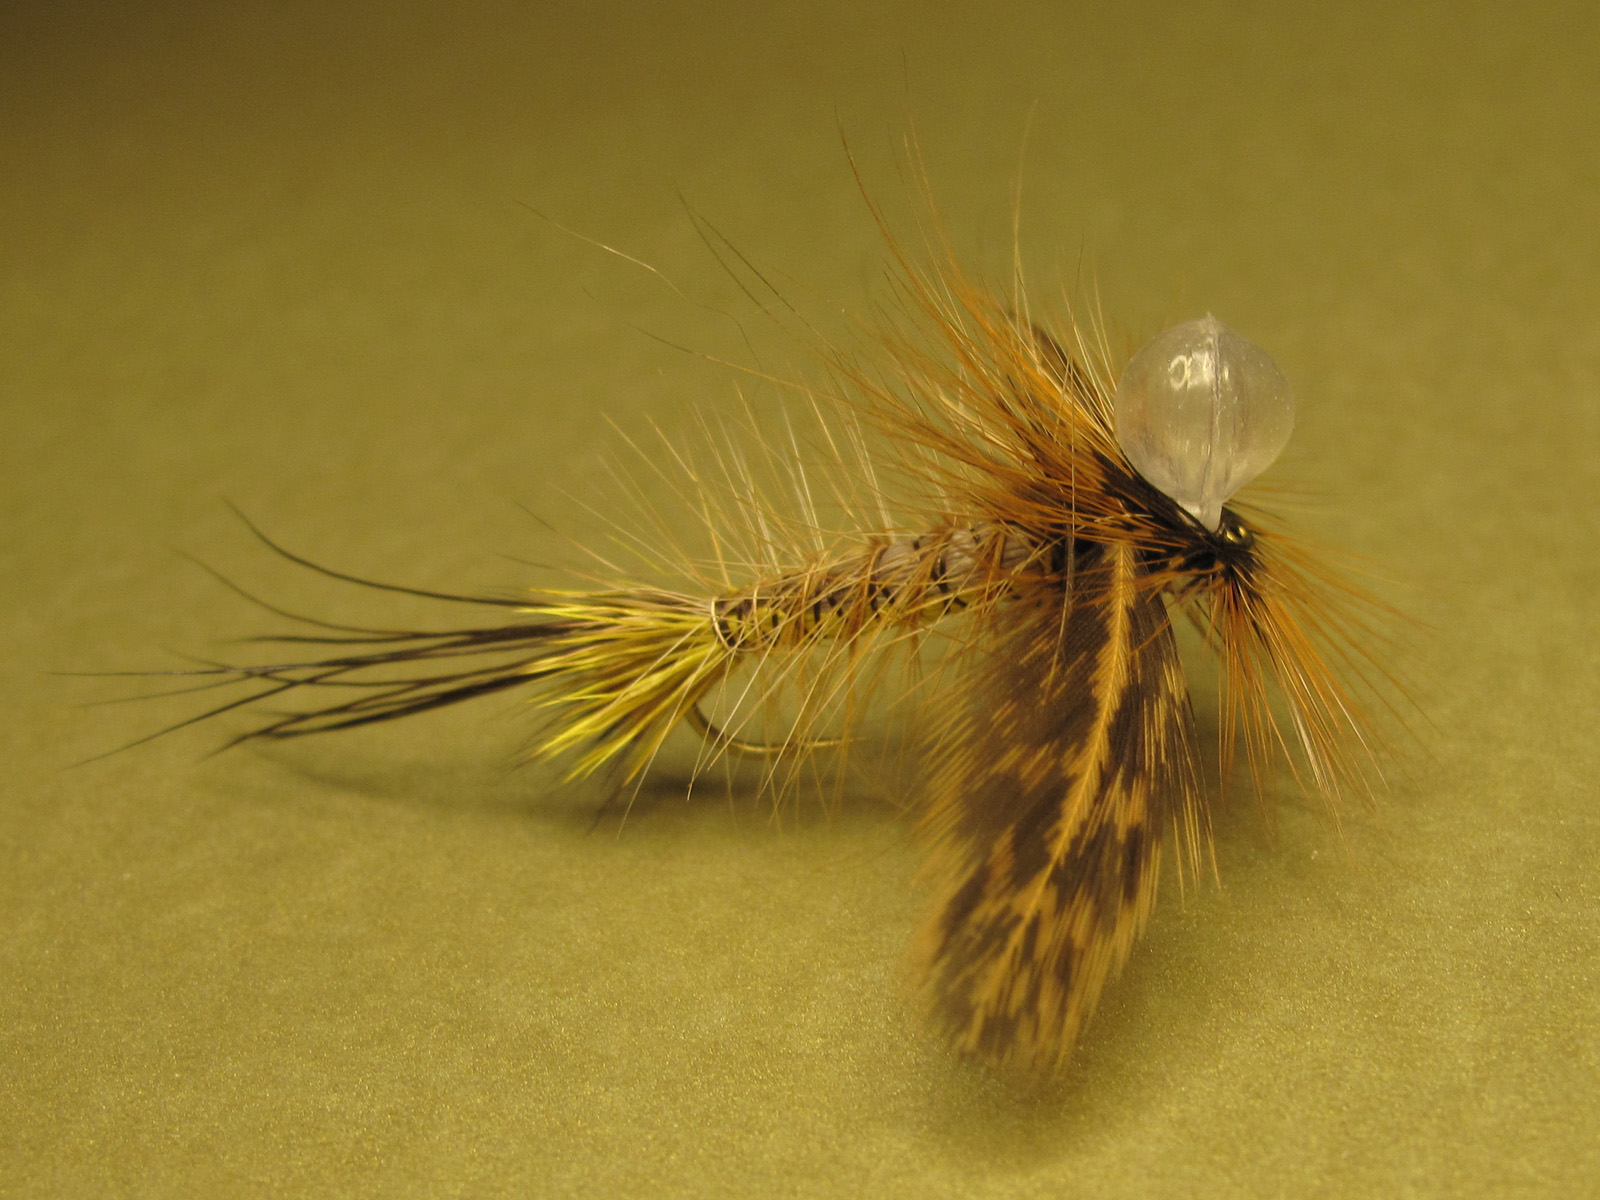
 So...thanks to the bubble it's not exactly a purist dream but a great fly during drake and hex time for anything that is willing to come up and eat them! This is a fly I definitely do not offer commercially since anybody not named Bill Gates couldn't afford them, but it is a fun fly to tie and fish on a heavy leader! This pattern is really an adaptation of what has been my favorite northern Michigan Hex pattern to allow for the addition of the Unibobber to aid in floataion. This particular shoot was done of one with a clear Unibobber, but they also make a glow in the dark Unibobber which is pretty solid for this application.
Thread: UTC140
Hook: Tiemco 5212, size 8
Tail: Moose Body
Body: Deer Body, natural and yellow
Wings: Hen Back, Speckled Brown (natural)
Body Hackle: Ginger Hackle
Wing Hackle: Furnace Hackle
Float: Unibobber
 STEP 1: With your Tiemco 5212 size 8 secured in the vice get your thread startedsomewhere around the middle of the hook shank. Grab a small clump of Moose and measure it out to be the full length of the hook, then tie it in hanging off the back of the hook. Bind it down securely with wraps back to the rear tie in point and then forward about three quarters up the shank.
 STEP 2: This step will be tan deer body on top of the shank and yellow under the shank. Cut out a clump of hair and prepare by stroking out the short and guard hairs then tip stacking. Hold the hair in place so that the tips extend out just past the bend of the hook and tie in with a few firm wraps, then trim the butts and bind down. Invert the hook and repeat with yellow deer body on the underside of the shank.
 STEP 3: Stroke the hairs back and hold them in place as you spiral wrap back to the rear tie in point. At the rear tie in point give yourself three or four wraps right on top of each other. At this point I usually dot the wraps with Zap a Gap.
 STEP 4: Select a ginger hackle feather to be used for the body, generally between a size 12 and 14. Prepare the feather by pulling the fibers down from the tip to reveal the stem, and tie the feather in with a pair of wraps. Once the feather is secured then sprial wrap back forward over the body of the fly.
 STEP 5: To complete the body you will now palmer the feather forward. Take care as you wrap forward to stroke the fibers back so you do not trap too many against the body. Once you get about three quarters of the way up the shank then tie the feather off. At this point I usually dot the wraps again with Zap a Gap.
 STEP 6: Select the largest furnace hackle feather you can get off your neck and prepare it by stripping the fibers and chaff from the bottom inch of the feather. Tie it in place and palmer half a dozen wraps right next to each other, then tie off the feather and trim the excess.
 STEP 7: Prepare a few hen back feathers for this step by measuring out the feather to be the length of the hook shank, and strip the rest to the quill. Once the feathers are prepared then you will figure eight them in place directly in front of the hackle from the last step. I know some that are able to do both at once, but I find it easiest to tie in each feather separately.
 STEP 8: Over the wings I tie in a second furnace hackle, again as large as you can get. Once I have a few wraps tightly in place I again hit this spot with a dot of Zap A Gap to add a little durability.
 STEP 9: With the deer hair and hackle tied in, clipped, and wrapped down the end result should be a small 'ramp' down towards the hook shank. Slide the Unibobber over the eye of the hook and wedge it up over those butt ends. With a few tight figure eight wraps it is now held securely in place.
 STEP 10: The final step is to palmer the last hackle on an angle around the Unibobber and eye of the hook, then tie it off and whip finish.

The way this fly is constructed the fly will ride high in the film to start with, then after a bit the tail will settle in to the surface film and the front of the fly will continue to ride high. As with all Hex and Drake patterns make sure you have a short and stiff leader to keep the fly from spinning too much. Have fun with it!
-mike schmidt
http://www.anglerschoiceflies.com/
One sweet looking fly bro!
ReplyDeleteYou know, I always wanted to ask you for a step by step of some of your flies but I know you sell commercially and did not want you to feel that you are giving secrets out. I do enjoy every fly that you tie!
ReplyDeleteThanks guys, I appreciate it!
ReplyDeleteI do put up step by steps from time to time Dustin, always happy to help other guys that want to tie their own. I also have a CD on my site with 25 patterns and will have volume two at the shows this fall.